Showing posts with label Customisation. Show all posts

Sunday, 24 March 2019

Solution Layers

In Dynamics 365 Online, you may have recently noticed a new button within an unmanaged solution, 'Solution Layers'. I first saw this appear around 17th Mar 2019, and it's a welcome tool to help understand more what happens with multiple solutions in a system.


I've been playing around with this a bit in the last week, and there are a few key concepts to understand from the beginning.
  • The button is currently only visible within an unmanaged solution or the default solution. This seems to be because managed solutions are not directly editable, though I think this is a bit of an oversight, because...
  • When you click the button for a solution component, it will display any managed solutions that contain that component, along with an 'Active' solution. From what I can tell so far, I'm treating the 'Active' solution to be the same as the default solution, but there may be subtle differences
  • It makes sense that this only displays managed solutions, as these are the only one solutions that a individually layered. In contrast, unmanaged solutions are all combined into the one unmanaged layer
So, it's a little confusing to start with, in that you can only access it from the unmanaged layer, but it is displaying information about the managed layers. But, leaving that aside, what does it tell us ? It provides information at 2 levels; first the list of layers, then the detail properties that were set within that layer.
The Layers
When you click on the 'Solution Layers' button, it will list all the managed solutions that contain this component, and the order in which they apply. 

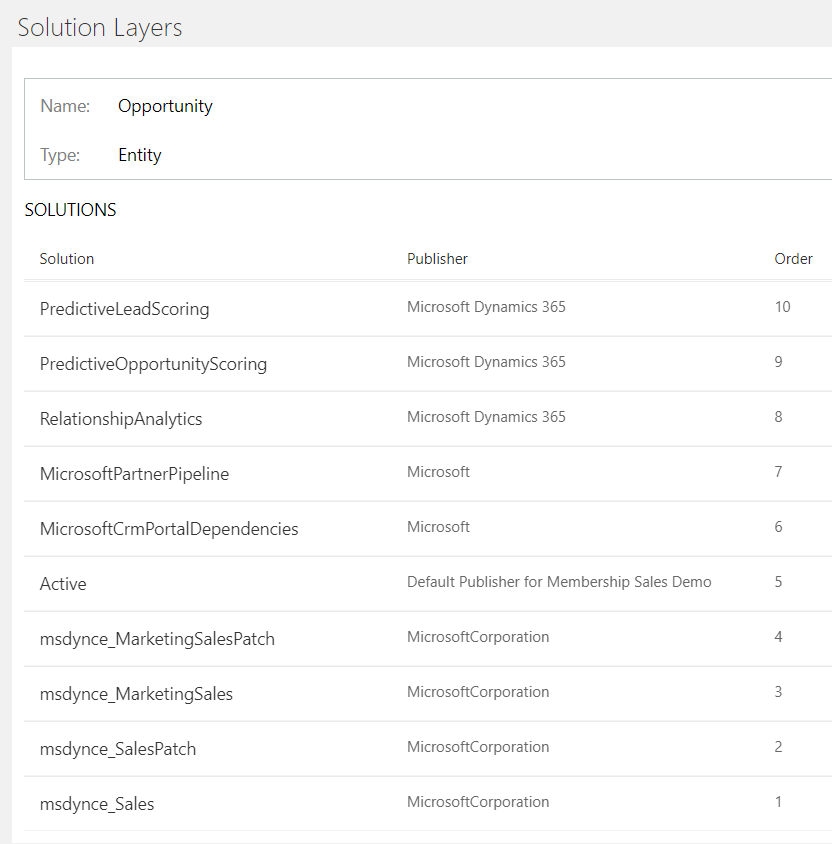
Order no.1 is the first solution in which this component was imported into this organisation, with the remaining solutions in incremental order. The order listed is the order in which any changes will be applied; I think this would normally be the order in which the solutions are installed, though I suspect that Microsoft may change the order of some of their solutions, irrespective of the installation sequence. So, we start with order = 1, then any changes from each other solution are applied in turn, so that a change from a higher Ordered solution would override a change to the same property in a lower Ordered solution.

So, the information we get here is what solutions contain a component, and the order of the solutions. The interesting thing here is that some layers appear above the Active layer; from what I can tell so far, only solutions from Microsoft appear above the Active layer.
Properties within a Layer
If you click on a layer, it will then show the component properties within this layer. The 'Changed Properties' tab shows the component properties within this layer, and what value they were set to in this layer.

So, in this case we see that the msdynce_SalesPatch changes 3 properties of the Opportunity entity, for example the isauditenabled property. This indicates that the 'Include Entity Metadata' option had been selected when the entity had been added to the solution in the source system, which is one of the useful pieces of information that we can now get from the Solution Layer.

The 'All Properties' tab shows all the effective properties at this layer - i.e. taking all properties from layers at a lower order number, and applying the properties from this layer, but these can be overridden by layers with a higher number.


Note that, in the example above for the Opportunity entity, you several solutions were listed, but many don't have any changed properties. I think this is mostly because an entity will be included in a solution because one of its subcomponents (e.g. a view) has changed. To see this, you'd have to open Solution Layers on the subcomponent.

Different component types have different properties. Unfortunately the information given so far is, unsurprisingly, only the whole property. So, for example for a form, we just see the formxml and formjson, and this doesn't give us a representation of how forms are merged across solutions. However, I'm intending to dig further into whether the 'All Properties' tab can give an indication of how the formxml changes through the layers - if I find anything interesting then that could be another blog post

Friday, 6 August 2010

A view of records owned by the user's business unit

Bubbling something up from an answer I gave on the Dynamics CRM forums. Although it may not seem obvious within Advanced Find, it is possible to create a view that displays records owned by a user's business unit.

The following gives the contacts owned by the current user's BU - strictly it's composed as 'contacts owned by a business unit that contains the current user'

Contacts
Owning Business Unit
Users (Business Unit)
User Equals Current User

Sunday, 14 December 2008

Invalid Argument error when importing unpublished entities

If, like I did recently, you export an entity before it has been published, you will get an 'Invalid Argument' error when importing the entity if it has any relationships.

The reason for this is that the relationship attribute will have no display name, which results in the error. The simplest solution would be to go back to the original deployment, publish the entity, then export again. But, if that's not an option, you can fix the problem within the exported xml as follows:

The invalid relationship xml will look like the following:

<field name="pjv_targetid" requiredlevel="required" imemode="auto" lookupstyle="single" lookupbrowse="0">
<displaynames />
</field>


The problem is that the displaynames element is blank. This can be changed to something like the following

<displaynames>
<displayname description="Target" languagecode="1033" />
</displaynames>


The languagecode attribute will need to be set to the correct value for your deployment. Many other elements will have this value set in the customizations.xml file

Monday, 8 September 2008

Cannot set Price List when Previewing Form

I came across a quirk of the Preview functionality of the CRM 4.0 Form Editor. When previewing an entity with a relationship to the price list - e.g. opportunity, quote - the Price List lookup doesn't display any price lists, so you can't set one. As far as I can tell this is due to the multi-currency functionality - the lookup normally filters by currency, but this logic is missing from the preview. Manually setting a currency in the preview form doesn't help.

This caused me an issue once when testing client script, but there's a fairly simple way around it - you can still set the price list code. This is something I commonly do if the customer has just the one price list. Here is some sample code I use in the form load event:

if (crmForm.FormType == 1)
{
var o = new Object();
o.id = '{A0E0F731-E96C-DD11-AABD-0003FF74F5B7}'; /* Change this Guid */
o.typename = 'pricelevel';
o.name = 'Standard Price List';
var a = new Array();
a[0] = o;
crmForm.all.pricelevelid.DataValue = a;
}

Note that this is only appropriate in a single-currency scenario. If you have multiple currencies, you'd be better off putting the code in the change event for the currency field, and picking an appropriate price list for the currency.

Friday, 27 June 2008

Associated views on Quote Product and Order Product entities

The facility for adding Write-In products to the Order and Quote entities is implemented within CRM through 2 associated views on each of the Quote Product (quotedetail) and Order Product (salesorderdetail) entities. These are used for the Existing Products and Write-In Products navigation items respectively.

This can have effects elsewhere, however. If you create a custom one to many relationship from another entity to the Quote Product or Order Product entity, then only one of the associated views is used within the parent entity. This can cause a problem, because neither associated view displays all the data (one displays the write-in products only, and the other displays the existing products only). For example, the default associated view is the Existing Products view, so write-in products would not be displayed.

There are 2 possible solutions to this. One is to change which is the default view, the other is to change the filtering within one of the views. Both of these are configured via attributes of the savedquery entity. These can be modified in a supported way by using the CrmService.Update method for the savedquery entity, or in an unsupported way by modifying field values directly in the savedquerybase SQL table.

Which associated view is displayed is controlled by the IsDefault attribute - if you change this then it's your responsibility to ensure only one view has this set to true.

The filtering is applied based on the ColumnSetXml attribute, which is essentially a FetchXml expression. For example, the ColumnSetXml for the Existing Product view is:

<columnset version="3.0">
<filter type="and">
<condition column="isproductoverridden" value="0" operator="eq" />
</filter>
<column>productid</column><column>priceperunit</column><column>quantity</column><column>extendedamount</column><column>salesorderdetailid</column><ascend>productid</ascend>
</columnset>

If you wanted this view to include all Quote Products, then you could remove the whole filter and condition elements. Note that such a change would necessarily affect the Existing Product view within the Quote entity.

Wednesday, 30 January 2008

MSDN Code Gallery

Microsoft have just made the new MSDN Code Gallery live. This is a site for sharing sample code, and I've posted some of my example code from previous blog articles. So far I've posted the following 4 resources:

MSCRM: Automate Local Data Group creation

Microsoft CRM report of all files related to an account

MSCRM - web page hosting to extend client script

Writing reports to use in IFrames and from ISV.Config in Microsoft Dynamics CRM

For reference, if you want to search for CRM examples, there's an emerging tagging protocol to tag all CRM examples as both CRM and Dynamics, so you can search on either tag. I'm also tagging samples with reports as 'Reporting Services'

Friday, 14 December 2007

Automating Local Data Query Creation

I've been invited to post on the Microsoft Dynamics CRM Team Blog again. This time I posted about how to automate the creation of the local data groups that specify what data each user of the Laptop client take offline.

Rather than repeating the text, you can read the article here

I've posted sample code for the article on CodePlex

Monday, 3 December 2007

Providing different default views for different CRM users

Or, how to modify CRM grid pages via client script.

CRM provides 2 standard ways to add custom client script into the CRM application; via form events, and through menu items and buttons in ISV.Config. Neither of these allows you to write code to control the default views for CRM entities

However, there is a way round this. The approach is to create a host HTML (or ASP .Net) page that has no interface components itself, but contains the CRM page in an IFrame. This will appear exactly the same as the standard CRM page, but allows you to write client script in your host page that controls the CRM page, and hence change which view is displayed.

Note that this approach has to be considered as unsupported, as it involves programmatic control over a picklist outside of a CRM form.

Building the host page
There are 2 aspects of the host page; providing the HTML to host the IFrame without adding extraneous borders or padding, and adding client script that runs once the IFrame has loaded.

The following HTML shows how to host the IFrame:

<body style="margin:0" onload="Init();">

<iframe onreadystatechange="ors();" id="ifr" src="about:blank" width="100%" height="100%" frameborder="0" leftmargin="0">
</body>

In this example I’m creating a generic page that can host most CRM grid pages, and I’m setting the src property of the IFrame programmatically:

function Init()
{
var etc = getQS('etc');
if (etc != null)
{
document.all.ifr.src = '/_root/homepage.aspx?etc=' + etc;
}
}

This src is the standard way to display most entity grids, with etc as the object type code of the entity.

I’m using the onreadystatechange event to determine whether the IFrame has loaded:

function ors()
{
if (event.srcElement.readyState == 'complete')
{
var sView = getQS('view');
if (sView != null)
SetView(sView);
document.all.ifr.style.visibility = 'visible';
}
else
{
document.all.ifr.style.visibility = 'hidden';
}
}


This checks the readyState property of the IFrame, which will equal ‘complete’ when the IFrame contents have loaded, and the IFrame contents after they have been modified.

The following code shows how to modify which view is selected:

function SetView(sView)
{
var ifDoc = document.frames['ifr'].document.all; // access IFrame contents
var oSel = ifDoc['SavedQuerySelector']; // picklist control to select view
if (oSel != null)
{
var v = GetSelectValue(oSel, sView);
if (v)
{
oSel.DefaultValue = v;
oSel.DataValue = v;
oSel.FireOnChange(); // need to fire this event to apply changes
}
}
}
function GetSelectValue(oSel, sText) // helper function to select item in picklist
{
for (var i=0;i<osel.options.length;i++)

{
if (oSel.options[i].text == sText) return oSel.options[i].value;

}
}

The code uses another helper function to access parameters passed on the query string. This function is oversimplified in that it doesn’t cope with all possible encoding issues, but is sufficient for this example:

function getQS(name)
{
var ret = '';
if (window.location.search != null && window.location.search.length > 1)
{
var aQS = window.location.search.substring(1).split('&');
if (aQS != null)
for (var i=0;i<aQS.length;i++)
if (aQS[i].indexOf(name + '=') == 0)
ret = aQS[i].substring(name.length + 1).replace('%20', ' ');
}
return ret;
}

Putting this all together, we have a page that will display an entity grid, and change the default view, based on 2 query string parameters. For example

defaultViewChanger.htm?etc=1&view=Active%20Accounts

Will display the account grid, and set the view to the Active Accounts view (%20 is the encoding of a space, which is not permitted in a url).

Setting different default views for different users
We now have a page that can programmatically change the default view. There are 2 ways this can be used to provide different default views to different users: a programmatic way that identifies the current user (and probably team or role membership) and hence determines the default view, or via permissions in SiteMap.

I’m not intending the cover the programmatic route in detail here; my preference is to convert the page to an ASP .Net page that identifies the current user and their role, and populates the parameter to SetView in server code; an alternative approach in client code can be found here.

Another approach is to make use of the Privilege element in SiteMap to display different navigation links to different sets of users based on their permissions, as described in more detail here. Let’s assume we have 2 groups of users who want different default views of the account entity, group A (who are members of security role ‘roleA’) want to see My Active Accounts, and group B (members of ‘roleB’) who want to see Active Accounts.

We can create a dummy entity in CRM called exc_acctsecurity and grant roleA write rights on the exc_acctsecurity entity, and grant roleB assign rights. Then we can modify SiteMap, replacing the SubAreas for the account entity to the following:

<SubArea Id="nav_accthostA" Title="Accounts" Url="http://server/defaultViewChanger.htm?etc=1&amp;view=My%20Active%20Accounts" Icon="/_imgs/ico_18_1.gif">
<Privilege Entity="exc_acctsecurity" Privilege="Write" />
</SubArea>
<SubArea Id="nav_accthostB" Title="Accounts" Url="http://server/defaultViewChanger.htm?etc=1&amp;view=Active%20Accounts" Icon="/_imgs/ico_18_1.gif">
<Privilege Entity="exc_acctsecurity" Privilege="Assign" />
</SubArea>

Note the use of XML encoding (&amp; instead of &).

One drawback of this approach is that anybody in the System Administrator role will see both SubAreas.

A complete example of the HTML and SiteMap can be found on CodePlex.

Viewing all files in CRM related to an account

I've recently published a second CRM related reporting services project on codeplex. This one illustrates how to get a list of all files related to a CRM account. This includes files attached directly to the account or via related objects (e.g. contacts, opportunities, cases), and also includes both file and email attachments.

Most of the work is done in the SQL, which I've written as a set of SQL views for ease of reading, rather than embedding all the SQL in the report.

The project also illustrates how to link to CRM objects, within a report, as the report contains reporting services actions to display the CRM entity forms, and also actions on each file to link to the CRM file download dialog.

This report is written so as to take parameters from a ISV.Config button, as described here

Wednesday, 21 November 2007

Using permissions to personalise SiteMap

CRM allows modification of the CRM application navigation structure via SiteMap. This is normally considered to provide one customised navigation structure for all CRM users, with the only difference between what one user sees and what one of their colleagues sees is what they have permission for.

For most entries in SiteMap, whether they are displayed or not depends on the user’s permission on the corresponding entity. For example, if a user does not have Read privileges at any level on the invoice entity, they will not see invoices in SiteMap. However, SiteMap allows more explicit control over what privileges are required to display any link; this is done via the Privilege element.

The following extract from the default SiteMap illustrates how this is used:

<SubArea Id="nav_managekb" ResourceId="Homepage_KBManager" Icon="/_imgs/ico_18_126.gif" Url="/cs/home_managekb.aspx" Client="Web"> <Privilege Entity="kbarticle" Privilege="Read,Write,Create" /></SubArea>
This specifies that the Knowledge Base link in the Services Area should only be displayed to users who have Read, Write and Create privileges on the kbarticle entity.

Privilege elements are interpreted based on these rules:
  • In one Privilege element, the user must have all privileges listed in the Privilege attribute
  • The level of privilege doesn’t matter; user level is sufficient
  • Multiple Privilege elements can be specified for one SubArea; in this case the user needs to fulfil the permissions for every element

There is no requirement for the Privileges element(s) to be related to the entity (or external link) that is displayed.

Using the Privileges element
Given this, it is perfectly reasonable to create multiple SubArea elements in SiteMap that would show similar (but not identical) information, but only display one of them to any given user, based on their permissions. For example, you may have created custom portal pages, but the customer service staff should see a different page from that seen by marketing staff. Showing a different page for each set of users could be achieved with the following entries in SiteMap:

<SubArea Id="nav_portalService" Title="Company Portal" Url="http://server/supportportal.htm" Icon="/_imgs/ico_18_home.gif"> <Privilege Entity=”incident” Privilege=”Create” /></SubArea><SubArea Id="nav_portalService" Title="Company Portal" Url="http://server/marketingportal.htm" Icon="/_imgs/ico_18_home.gif"> <Privilege Entity=”campaign” Privilege=”Create” /></SubArea>

This works providing that support users can create cases (schema name incident) but not campaigns, while the opposite applies to marketing users.

This approach can work well assuming suitable privileges can be found to distinguish between different groups of users, but what if there aren’t any suitable permissions ?

Creating dummy entities for permissions
The Privileges element can refer to custom entities, and there is nothing to stop us creating one or more entities solely for the purposes of personalising SiteMap. For example, we could do the following:

  • Create an entity called dummy_security
  • Grant one role, ‘Support Role’, Write privilege on this entity
  • Grant another role, ‘Marketing Role’, Assign privilege on the entity
  • Ensure users are added to the appropriate role
  • Change the above snippet from SiteMap to the following:

<SubArea Id="nav_portalService" Title="Company Portal" Url="http://server/supportportal.htm" Icon="/_imgs/ico_18_home.gif"> <Privilege Entity=”dummy_security” Privilege=”Write” /></SubArea><SubArea Id="nav_portalService" Title="Company Portal" Url="http://server/marketingportal.htm" Icon="/_imgs/ico_18_home.gif"> <Privilege Entity=” dummy_security” Privilege=”Assign” /></SubArea>

This would give users the correct link, without relying on existing privileges that may change based on changing job roles, or changing business requirements.

The one thing to watch for is to make sure you don’t grant Read or Create privilege on this new entity; this will ensure it will not appear to users anywhere in the normal CRM application. Note that members of the System Administrator role will necessarily see all the SubAreas, because they will automatically have full privileges on all entities.

Monday, 12 November 2007

Changes to client-side code for CRM 4.0

Following on from looking at server-side code changes for CRM 4.0, here's what I know so far about client-side code changes. Again, this is based on the CTP3 code so may soon become out-dated. Another caveat is that it is based on investigation of the CRM client files, and not on the SDK documentation (which at time of posting is incomplete); hence, some of what I cover may well be undocumented and hence unsupported.

Calling CRM web services directly
This has never been a favourite approach of mine, as the creation of the SOAP data in client-code seems too fragile; I prefer to create server-side web pages or services to abstract the CRM web service. However, I know many people who make direct SOAP requests, and there is another consideration - if customising a deployment on Windows Live you will not be permitted to deploy server web code, so you will have to make direct requests.

If you do make direct requests, you will need to pass the new CrmAuthenticationToken within the SOAP header. Rather than generating this yourself, there is a new global method for this:

GenerateAuthenticationHeader();

CRM 4.0 now provides a proper web service interface for offline use. This can be accessed from client-side code via the http://localhost:2525 location.

New Global Variables
CRM 4.0 provides the following documented global variables related to the multi-language and multi-tenant features:
  • USER_LANGUAGE_CODE - Code (LCID) of the current user's language
  • ORG_LANGUAGE_CODE - Code (LCID) of the base language
  • ORG_UNIQUE_NAME - Current organisation name

New Object Properties and Methods
Note, everything in this section may be undocumented and hence unsupported. As you may know, the crmForm and field objects are implemented as HTML components (.htc files) in the /_forms/controls directory. A comparison between the CRM 3.0 and CRM 4.0 versions show the following changes:

All CRM 3.0 properties and methods seem intact, even the undocumented ones. I've not tested this exhaustively, but all current code works fine.

The crmForm object has the following new members:

  • fireSaveEvent
  • HideField - I hope this will become supported, as it will avoid direct DHTML manipulation
  • VerifyFieldIsSet
  • BypassValidation - a property to tell CRM not to validate fields

The Lookup control has more members, mostly to do with the new auto-resolve functionality:

  • AutoResolve and ResolveEmailAddress boolean properties
  • AreValuesDifferent method allows comparison between the lookup contents and a supplied array of values

The Picklist control exposes the underlying properties of the select HTML element, SelectedIndex and SelectedOption.

Across these, and the undocumented members from CRM 3.0, what I see as most significant is the extent to which they will be supported in CRM 4.0. We shall see.

Friday, 9 November 2007

Retrieving Billable time and activity time for cases

When a case is resolved in CRM, the user can specify the amount of Billable Time spent on the case, and they can also see the total activity time spent on the case:


Both sets of information can be useful, and are necessarily stored in the CRM database. However, how you retrieve these figures is not well documented.

Where the data is stored
Data about the case is stored in 3 main entities (note that I'm using the schema name for the entities, and in the schema a case is called an incident):

incident: This is the main case entity, which stores the information you see on the main form, but does not include and of the duration information listed above. The statecode field identifies whether a case is open, resolved or cancelled.

incidentresolution: This is strictly a special type of activity, and stores the user entered data in the Case Resolution dialog. The 'Resolution Type' is stored in the statuscode field, and the user-entered 'Billable Time' is stored in the timespent field.

activitypointer: All activities related to a case have an activitypointer record. The duration of each closed activity is stored in the actualdurationminutes field.

There are a couple of additional complexities to the data storage:
  1. It is possible for a case to have been resolved, then reactivated, and resolved again. This results in 2 incidentresolution records, so you need to identify the correct one. I always go by the most recent
  2. The incidentresolution entity is a type of activity, hence has an associated activitypointer record. Fortunately, this record has no value for the actualdurationminutes, so doesn't affect any calculations of total activity time. However, you do have to be aware of this if you want a count of the number of activities

Retrieving the data
Case data is normally retrieved via reports, and hence SQL queries. The following query shows how to extract the correct Billable Time and Total Activity Time:

select i.incidentid, i.title, ir.actualend
, max(timespent) as BillableTime
, isnull(sum(a.actualdurationminutes), 0) as TotalActivityTime
from filteredactivitypointer a
join filteredincident i
on a.regardingobjectid = i.incidentid
left outer join filteredincidentresolution ir
on i.incidentid = ir.incidentidand ir.statecode = 1 -- Resolved incident resolutions
and ir.actualend = (select max(actualend) from filteredincidentresolution ir2 where ir2.incidentid = ir.incidentid and ir2.statecode = 1) -- Most recent ir activity
where i.statecode = 1 -- Resolved cases
group by i.incidentid, i.title, ir.actualend

A few comments on the query:

  1. I'm only returning resolved cases in this example, but I've used an outer join to incident resolution to make it easy to change the i.statecode filter to include unresolved cases
  2. I'm using isnull on the actualdurationminutes field to return 0 if there is no activity time
  3. If you add any other fields from the case, or related entities (e.g. account), you'll need to add them to the group by clause as well as the select clause, or join to them in a separate query

Displaying the data in CRM
As the billable time and activity time are not stored in the incident entity, they cannot be displayed directly on the case form or in any views. To display this information in the case form, my preferred approach is to create a report using the above SQL query, and display this in an IFrame on the case form, using the techniques described in Writing Reports to display in IFrames

In CRM 3.0 there is no useful way to display this data in a view. In CRM 4.0 this should change, though it may not be as easy as you'd like; CRM 4.0 allows display of related data in a view, but it looks like this is only data from parent entities (e.g. the account to which a case belongs), not the summarised data from child entities that we're discussing here. However, the new PlugIn model allows intercepting of the view data, and should permit such display of child data with a bit of code. This is something I'll be posting on in the future, but it will have to wait till the CRM 4.0 SDK documentation is finalised.


Thursday, 8 November 2007

Using reports in IFrames and from ISV.Config

This blog is not the first one I've posted on; I've previously been invited to post on the Microsoft CRM Team blog, and I posted this article Writing Reports to display in IFrames and from ISV.Config

It seems unnecessary to repeat the post here, so I won't. However I will soon be posting some additional reports that build on this technique.